Edit user permissions
Note
You need admin rights to add, edit, or delete an account.
Note
When you create a new user in the Myra App, this new user has no permissions yet. To assign permissions to a new user, assign them either local or global permissions.
Proceed as follows to edit the permissions of a group:
-
► Open the User Management view, see Section User management.
-
► Select the user whose name you want to change and click on the name of the user.
- ↳ The User details for <user name> view opens.
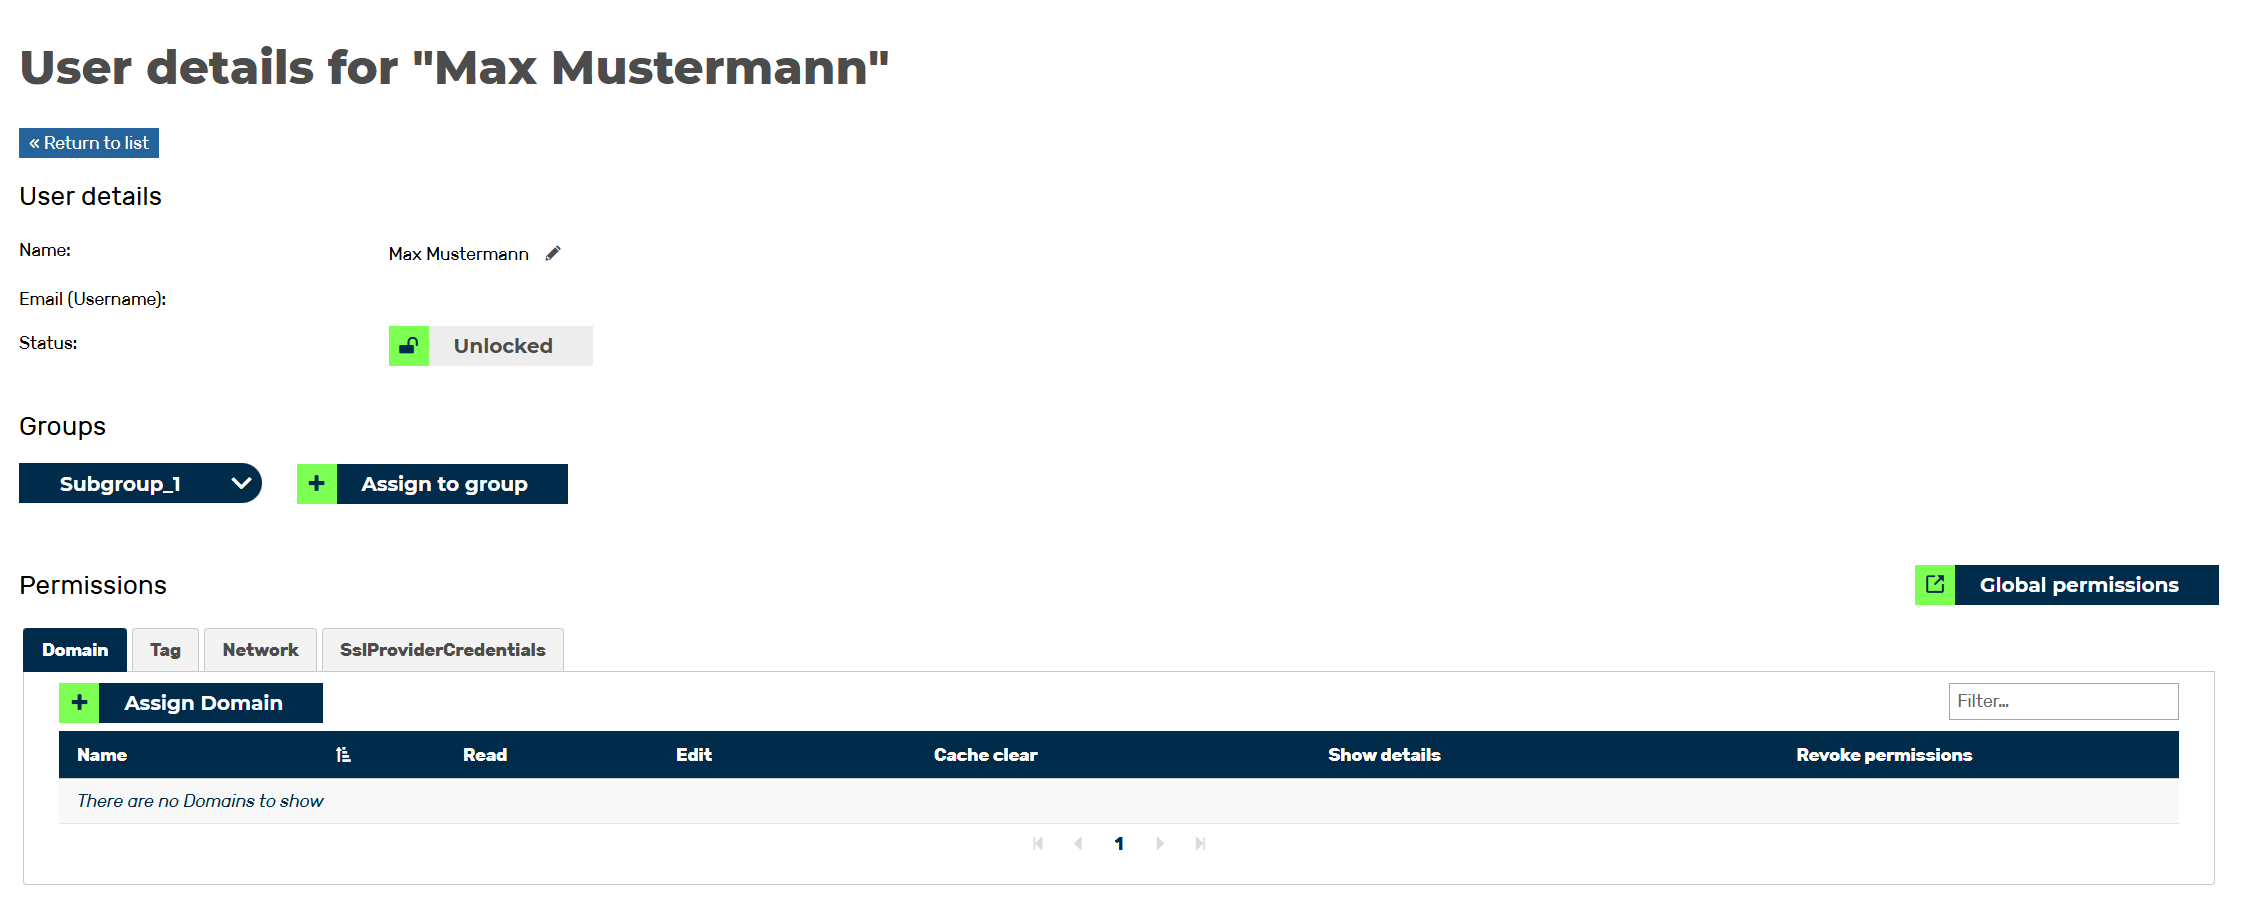
User details for <user name> view
- ► Navigate to the Permissions area.
For each user, you can decide whether you want to assign general permissions in the form of Global permissions or local permissions, for example for specific domains, subdomains, or tags.
Add global permissions
Note
To assign global permissions for individual functions under Domains, Tags and Networks, you must activate the permissions for creating, reading, or changing at the top level.
Only then can you customise the underlying functions according to your needs for individual users or groups.
Since permissions are inherited hierarchically, activating or deactivating create, read, and modify permissions affects all functions below them.
If a user is not granted permissions for certain functions, then the permissions that are not required must be revoked retrospectively.
Note
If global permissions have been set for an account or a group, all individually set permissions are overridden. A permission activated in a specific object remains valid even if the globally set permission is disabled.
Proceed as follows to add global permissions to a group:
- ► Click on the Global permissions button.
- ↳ The Global permissions dialog opens.
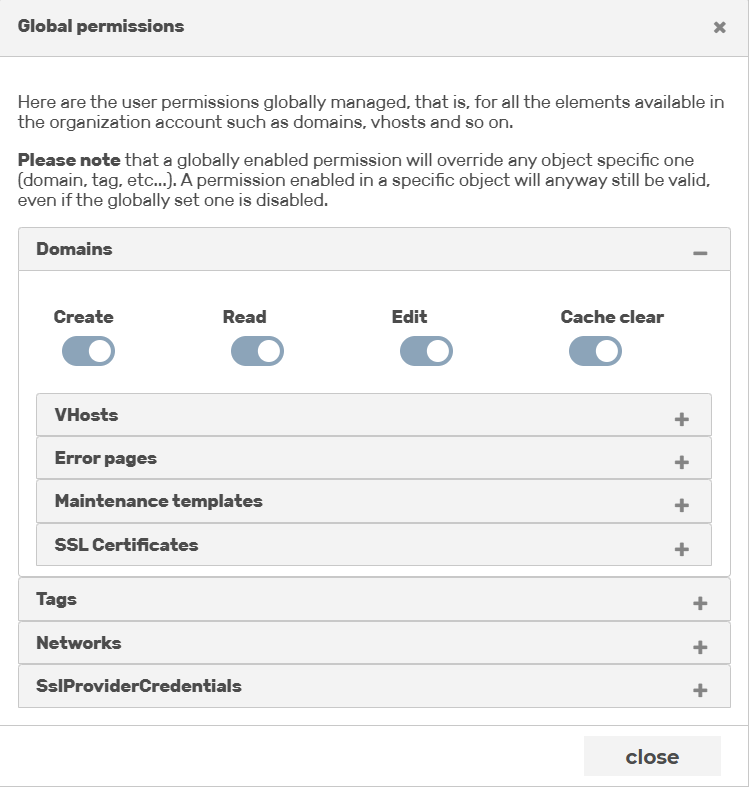
Global permissions dialog
-
► Depending on your needs, use the switches below the relevant categories to enable or disable permissions for: Create, Read, Edit, or Clear Cache.
For a detailed explanation of global permissions, see Section Global Permissions Option.
-
► Click on the Close button.
- ➔ The user is granted the assigned global permissions.
Add local permissions
Note
To assign local permissions for individual functions under Domain, Tag and Network, you must activate at least one entry with permissions for creating, reading, or modifying at the top level.
Only then can you customise the underlying functions according to your needs for individual users or groups.
Since permissions are inherited hierarchically, activating or deactivating create, read, and modify permissions affects all functions below them.
If a user is not granted permissions for certain functions, then the permissions that are not required must be revoked retrospectively.
Note
If global permissions have been set for an account or a group, all individually set permissions are overridden. A permission activated in a specific object remains valid even if the globally set permission is disabled.
Proceed as follows to add local permissions to a group:
-
► To add permissions at the domain level, click on the Domain tab.
-
▷ Click on the Assign Domain button.
-
↳ The Assign Domain (permissions) to group dialog opens.
- ▷ Enter the domain address in the text field and click on the desired entry in the results list.
- ▷ If necessary, repeat the process and add another domain to the list.
-
▷ Click on the Registration button.
-
↳ The dialog closes, and the domains appear in the Domain tab.
-
▷ Depending on your needs, use the switches next to the corresponding domain to enable or disable permissions for (Read), (Update), or (Clear Cache).
For a detailed explanation of global permissions, see Section Domains tab.
-
▷ If necessary, click on the
 icon to assign specific permissions for individual options at the domain or subdomain level.
 - ▷ If necessary, click on the X icon in the Revoke Permissions column to revoke all permissions for the tagged domain or subdomain.
-
-
► To add permissions at the domain level, click on the Tag tab.
-
▷ Click on the Assign Tag button.
-
↳ The Assign Tag (permissions) to group dialog opens.
- ▷ Enter the tag name in the text field and click on the desired entry in the results list.
- ▷ If necessary, repeat the process and add another domain to the list.
-
▷ Click on the Registration button.
-
↳ The dialog closes, and the domains appear in the Tag tab.
-
▷ Depending on your needs, use the switches next to the corresponding tag to enable or disable permissions for Read or Update.
For a detailed explanation of global permissions, see Section Tag tab.
-
▷ If necessary, click on the
icon to assign specific permissions for individual tag types, such as Create, Read, or Edit. - ▷ If necessary, click on the X icon in the Revoke Permissions column to revoke all permissions for the tagged item.
-
-
► To add permissions at the domain level, click on the Network tab.
-
▷ Click on the Assign Network button.
-
↳ The Assign Network (permissions) to group dialog opens.
- ▷ Enter the tag name in the text field and click on the desired entry in the results list.
- ▷ If necessary, repeat the process and add another domain to the list.
-
▷ Click on the Registration button.
-
↳ The dialog closes, and the domains appear in the Tag tab.
-
▷ Depending on your needs, use the switches next to the corresponding network to enable or disable permissions for Read or Update.
For a detailed explanation of global permissions, see Section Network tab.
-
▷ If necessary, click on the X icon in the Revoke Permissions column to revoke all permissions for the tagged network.
-
-
➔ Once all local permissions have been changed, the Myra App automatically saves the changes.